painted dresser || Chalk Paint® + MMS Milk Paint

About a month ago I picked up this cutie of a dresser at Habitat.  I thought it had darling lines and it was in good shape, it just needed some paint!

I kept the original brass hardware and I painted this dresser with 3 coats of Miss Mustard Seed Milk Paint, MARZIPAN.  I painted the sweet trim pieces with Annie Sloan Chalk Paint®, OLD WHITE.  I lighting sanded, just to distress the edges.  I sealed the entire piece with two light coats of Annie Sloan Clear Wax.

This cutie is for sale at the shop for $285.

painted furniture || ANTIBES GREEN CHALK PAINT®

A dear friend of mine is giving herself a beautiful home office.  She has switched some rooms around and is making a space that is absolutely bold and beautiful, just like her!  She had a solid hutch that she wanted painted, it's going to be her pop of color in the new office.  We settled on Annie Sloan's ANTIBES GREEN..... hutchbefore

It is a beautiful piece of furniture.  Solid, well built and has some really great storage.  It was a lovely piece to paint!

hutch1

2017-01-09-23-00-53

2017-01-09-22-59-22

2017-01-09-23-01-30

2017-01-09-23-02-50

I used Annie Sloan Chalk Paint, ANTIBES GREEN, Annie Sloan lacquer and Annie Sloan Clear Wax.

The hutch was originally intentionally distressed.  It had manufactured worm holes, gouges and was made to look old.  She wanted the new look to be shiny and crisp, no sanded edges or distressing the paint.  This piece took four coats of paint (I watered down each coat, I wanted it smooth!) two coats of Annie Sloan Lacquer and one coat of Clear Wax.  I can't wait to see this beauty in her new office space!  I hope this has inspired you to paint something....maybe something bright and bold!

xoxo


painted side tables || Miss Mustard Seed Milk Paint + Annie Sloan Chalk Paint®

I bought two night stands years ago at a garage sale.  I used them in the girl's bedroom for a while and then for the past few years they have been sitting in the garage.  I finally decided to paint these little guys....

2015-10-27 01.37.58

The blue color is BERGERE {Miss Mustard Seed Milk Paint} and the white detailing is OLD WHITE {Chalk Paint® decorative paint}.  I distressed the piece and then waxed it with Miss Mustard Seed Antiquing wax.

2015-10-27 01.33.39

2015-10-27 01.37.21

2015-10-27 01.35.21

2015-10-27 01.36.11

I priced them and plan on taking them to La Bella Casa.  However, I brought them into the living room to photograph them and now I kind of love them in the space.  They might stay here for a while....we shall see ;-)

painted oak vanity || Chalk Paint® by Annie Sloan

We haven't been working on too many projects at home lately.  Work has been extremely busy, which is good but makes for very little time to do anything else!!  We did sneak away to Pacific City for the day to celebrate my father-in-law's birthday.  We love Pacific City because we can drive right down on the beach and just camp out for the day!

2015-09-13 03.57.13

2015-09-13 03.55.06

At home, we have put together a plan to try to finish the basement space this winter.  We have to make my office space and finish the laundry room.  Mostly cosmetic and a lot of fun!  It's just finding the time to do it!

IMG_6042

We have a small bathroom down in the laundry room.  It's the 4th bathroom in the house and it has served as a storage room for me every since we moved in ;-)  I finally cleaned it out and decided it's time to spruce it up!!

2015-09-13 21.31.33

Here is the vanity cabinet after one coat of Old White Chalk Paint.  Before I started painting, I  wiped the cabinet down with warm soapy water, scuffed it with 180 grit sand paper, and started painting.

2015-09-16 05.21.03

2015-09-16 05.21.46

2015-09-16 05.21.18

I painted two coats of Old White Chalk Paint®, lightly distressed the edges and applied one coat of Annie Sloan clear wax.  It was such an easy change and it really lightened the room!  I have some more projects for this space and hopefully with the weather changing I will have a chance to get to them ;-)

growing girls and a newly painted hutch

IMG_5830

I feel so blessed to be able to stay at home with my girls.  Most of my work can be done early in the mornings, at nap time or when the girls play at Grandma's.

The other day, the girls and I were headed to the garden and Addilyn started the conversation…."my heart is so full right now. Savanna, do you love God with all of your heart, or just part of your heart?"  To which Savanna proudly replied "all of my heart."  Addilyn was pleased with her answer and replied "me too, that's why we have happy hearts.  Because we love God and He loves us even more".

The little conversation melted my heart and was the little piece of encouragement I needed.  I LOVE my work!  I could work all day long, every day of the week.  It can be a challenging balance to work (especially self-employed) and be with the kiddos, but for us, in this season we are in, it is so worth being home with the girls.  The girls even helped me paint this hutch…..

IMG_5842

IMG_5846

IMG_5848

IMG_5850

The top is painted with Annie Sloan Chalk Paint® (GRAPHITE) and waxed with two coats of clear wax and one coat of dark wax.  The inside is painted with Chalk Paint® (CREAM) and the bottom is painted with Miss Mustard Seed Milk Paint (BERGERE) and waxed with one coat of clear wax and one coat of dark wax.  This little beauty is headed to La Bella Casa this weekend so I can make room in the studio for more treasures!

Enjoy your weekend!  And your little ones!!

PAINTED HUTCH || painted with Chalk Paint®

I often forget to take pictures of different pieces I am working on.  I guess I just get side tracked, or I am just ready to move onto the next project ;-)  However, I did remember so here are a few pictures on a small hutch I finished last week….

IMG_5769

The top is has three different colors/layers (all Chalk Paint®)…..French Linen, Old White, and the top layer is Pure White.  The bottom is painted with Paris Gray.  I lightly distressed the entire piece and then sealed it with Annie Sloan's soft wax.  After applying two coats of soft wax, I applied Miss Mustard Seed's white wax in areas and allowed it to build up, giving the piece a bit of a bleached look.

IMG_5774

IMG_5775

IMG_5778

I added new knobs, painted the interior and called it 'good'.  It's a darling little hutch and it will soon be on it's way to La Bella Casa!

IMG_5784

Enjoy your week and happy painting!!!

CHIPPY VANITY || a painted vanity

I have this sweet little vanity that I got about 5 years ago.  I originally painted it for Addilyn's nursery.  I used milk paint (I was super pregnant and wanted something safe to work with) and painted it a sweet shade of light green.  I have always loved this little vanity, and had no intention of selling it!  However, I just don't have a place for it and I need furniture for my little space at La Bella Casa!  So, it got a makeover and will be headed to the shop next week….

IMG_5648  IMG_5654 IMG_5659 IMG_5651

IMG_5650

It was originally painted with a blue paint (probably lead based, the piece is very old).  When I got it, Matt completely sanded it down for me. I layered several milk paint colors and love the chippy, old look.  I sealed it with wax, added some pretty knobs, now she is all set for a new home!

A PAINTED DRESSER || before + after

Last month I found this darling dresser.  I am slowly trying to accumulate furniture pieces for when I move the shop downtown.  (By the way, it looks like we may have found a great spot!  I will share the details within the next week or so, when everything is finalized.)

Here is the BEFORE photo…..darling little details on this dresser!

dresser copy


And after….

IMG_5248

IMG_5246

IMG_5244

IMG_5238

IMG_5240

I cleaned the dresser with a de-greaser cleaner and then wiped it down with warm water.  I scuffed it up a bit with 100 grit sandpaper, it was pretty shiny.

I painted the drawers DUCK EGG, and the frame OLD WHITE.  I distressed the edges and then gave it two coats of clear wax.  I left the original brass hardware because I just liked the look of the brass against the blue.

Once I move the shop downtown, I will list her for sale.  If I don't keep her for myself ;-)

Happy Painting!

PAINTED FABRIC || painting fabric with Chalk Paint®

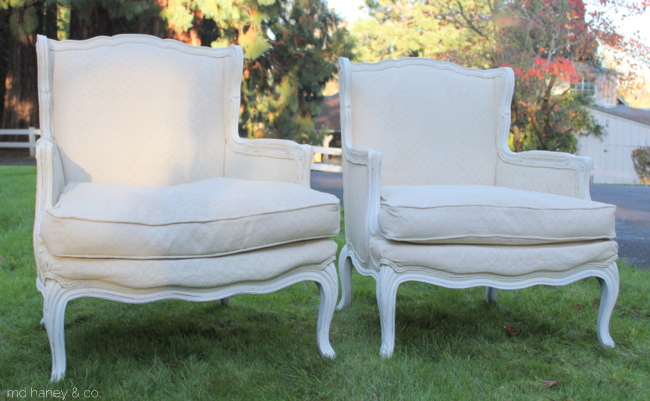
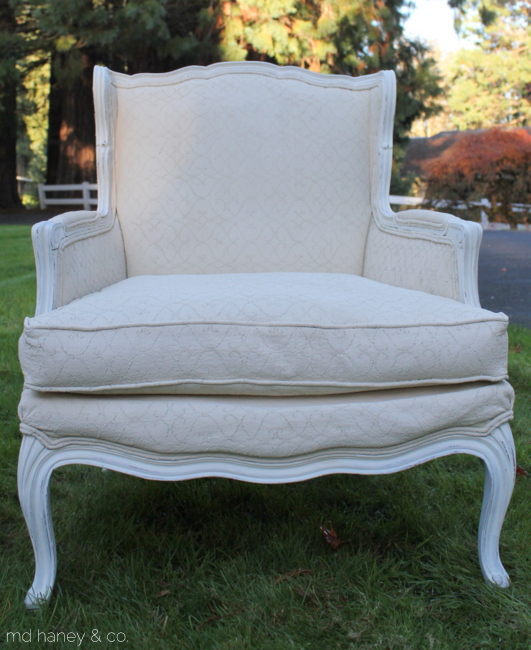
A few weeks ago, I received a phone call from a lady; they were moving her mom to an apartment and needing to downsize.  She wanted to know if I would like to come look at the items they were needing move.  I loaded up the girls, picked up a girlfriend and we were on our way.  She had a beautiful table and chair set.  Absolutely beautiful!  But, it was a big set and I didn't have room.  So I came home with a pair of chairs and some smaller treasures.

IMG_4837

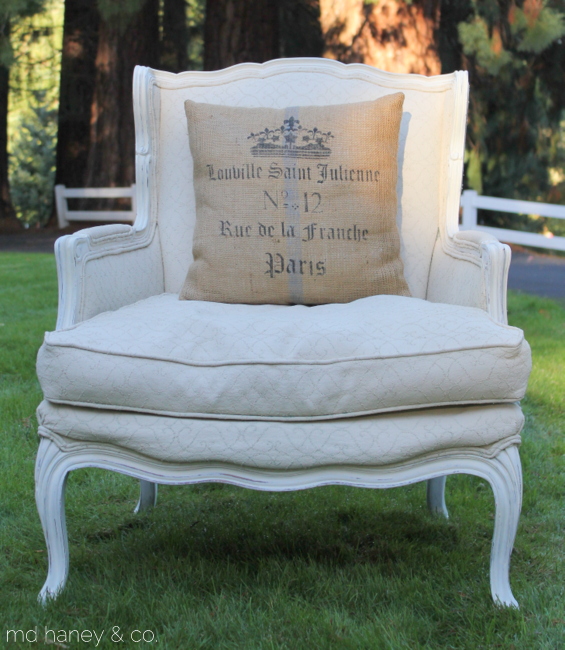
The chairs were in really good shape, and super comfortable.  Since I don't have the skills necessary to reupholster these beauties, I decided to paint them.

IMG_4957

IMG_4962

IMG_4963

IMG_4973

IMG_4970

Here are the details on how I painted fabric with Chalk Paint®.

- Vacuumed the fabric and trimmed the loose strings.

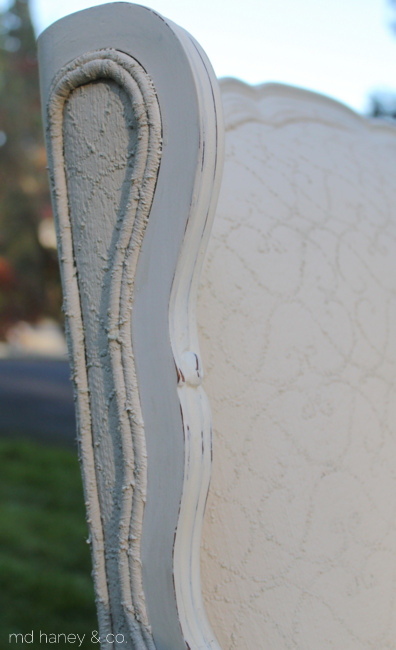
- Wiped down the wood with a warm, damp rag.  After allowing the wood to dry, I painted two coats of Milk Paint {Miss Mustard Seed Milk Paint ~ ironstone} on the wood.  I was fine with the paint chipping, so I did not apply the bonding agent.

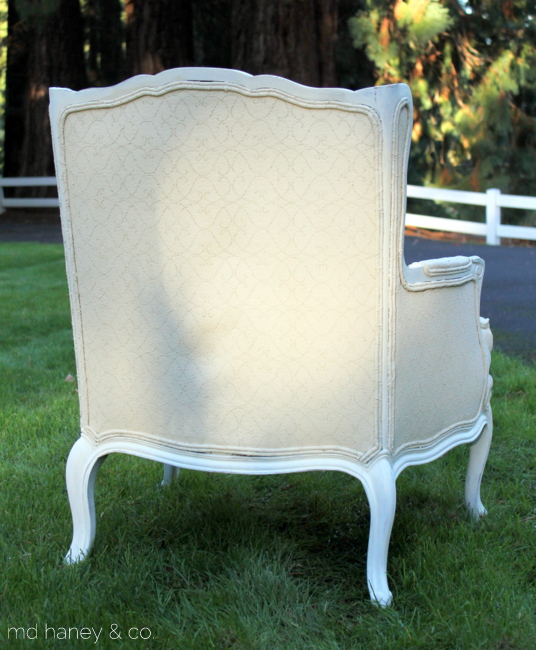
- For the fabric, I added water to Chalk Paint®.  I added 4 parts {OLD OCHRE} Chalk Paint® to a mason jar and 1 part water.  Shake it good to thin the paint down a bit.  By thinning the paint down it helps the paint to cover easier, and it makes it a bit softer to the touch once it dries.

- Once the fabric was painted, I touched up the painted wood with an artist brush.  I didn't tape anything off, so naturally I had a bit of the fabric paint color on the wood details.  I sanded the edges of the wood to give the wood a distressed look.

- The last step was to apply clear wax to the wood and the fabric.  The wax helped to soften the fabric and also provides a protective barrier.

I am very happy with the results.  The fabric is not 'crunchy' or hard.  It's not super soft like cotton or linen, it feels more like an outdoor fabric.  One day I may have these chairs reupholstered, but for now I am very happy with how they turned out!  And no sewing skills were required ;-)

VINTAGE VANITY || painted with milk paint

Customers all always asking me which I prefer….Milk Paint of Chalk Paint®?  My answer is usually the same; it totally depends on the piece of furniture and the scope of the project!

IMG_4808

IMG_4791

IMG_4802

This vintage vanity is feminine and very detailed.  Not to mention old with really darling curves an.

Four years ago {when I was very pregnant with my first} I stripped and sanded {well, my not-pregnant-sister sanded for me} this vanity down.  This was before Chalk Paint® or Milk Paint had become popular, before Pinterest, before I could google 'low odor' or 'natural furniture paint".   Anyways, I researched about Milk paint and I was able to locate a brand of Milk Paint that was carried in Portland.  I painted the vanity and a dresser a light green…I was hooked!  Milk Paint gives a very authentic finish, it adds to the character of an old piece.

Last month I participated in Carlton Crush-a local street fair/carnival event.  My theme was white pumpkins with pops of muted orange and pink.  I painted the vanity with a new color of Milk Paint {MMSMP apron strings} and used it as a display piece.  Last month I had no intention of selling it!  Now I need room in the studio for more furniture pieces I have picked up, so I am going to sell this darling vanity.  It would be perfect in a girls' bedroom, bathroom, home office or even in a living or dining room!

IMG_4809

46" Long x 30" Tall x 19" Deep

White Milk Glass Knobs

$195 ~ free local delivery available


A QUICK BED TRANSFORMATION || and my baby turns 3

Good morning friends!!

I thought I would show you a quick furniture 'BEFORE + AFTER'.  And a testament to how easy Chalk Paint® is to work with!!

2014-02-112

A friend was re-decorating her guest bedroom and asked if we wanted the Queen bed.  Of course I said yes!

IMG_3879

I loved the lines of it.  We wanted a Queen bed for the guest bedroom….it was just made to be :-)

IMG_3880

I painted it GRAPHITE.  I didn't sand or prime.  Just wiped it down with a clean cloth and started to paint.  It took two coats to get a really nice finish. I applied 1 coat of CLEAR WAX and it was ready to be set up in the guest bedroom the same day I painted.  Talk about instant gratification!

IMG_3933

The guest room isn't finished/decorated, but I wanted to show you how the bed turned out.

IMG_3936

I am addicted to this paint.  It makes painting so enjoyable and rewarding!

IMG_3935

Now I need to find a table and lamp.  I am thinking a red table could look really darling in this room…..don't you think?!?

IMG_3924

And, I thought I had some great pictures of my birthday girl.  Turns out, just a lot of videos and phone pictures.  This is a photo of when she crawled out of bed….her room was full of balloons when she woke up.  I got that idea from a friend {fill the bedroom with balloons while they sleep} and she was so excited when she woke up!

We spoiled her with lots of sugar, a new bike, and a trip to see her first movie at the theater.  Did anybody else cry like a baby at the FROZEN movie?  Oh I was a mess!  I think I can thank motherhood for that!

OK, off to {hopefully} finish up my chores at the vacation rental for the week!!

PAINTING WITH CHALKBOARD PAINT || an addiction

Hello!  I hope you had a wonderful and restful weekend!!

I get a lot of emails and questions about painting with ChalkBoard Paint.  {Not to be confused with Chalk Paint}.  ChalkBoard Paint is the paint that turns almost anything into a chalk board.  It can be purchased at almost any hardware or big box store.  I always have a quart {or two or three} hanging around!  Chalk boards are so fun! I love that they can turn anything ordinary, into something fun and unique.

Collages2

You have probably noticed I have a lot of chalk boards around my house….I guess it's my 'old house' now. ;-)

IMG_3138

And chalk board walls {my old office}….

IMG_3139

I love the look, and they are really fun for kids!

IMG_2912

I have quite a few tucked in here and there at the shop too!

Here are a few tips and tricks I have learned from painting with ChalkBoard Paint…..

IMG_3893

~ Cut in along walls and base, just like any other latex paint.  The consistency is a bit thicker than most latex, but treat it just like you are painting a wall or piece of furniture with a latex paint.

IMG_3898

~ Always apply 2 coats, and be sure to wait 24 hours between coats, and then another 24 hours before priming the surface with chalk.

IMG_3897

~ Most importantly, always 'prime' the painted surface.  By priming, I mean run chalk vertically and horizontally across the entire surface.  Then wipe it clean with a damp cloth.  If you don't prime your newly painted wall or furniture piece, your chalk writing will be etched into your new chalk board.  After it's been primed, you can write and draw to your heart's desire, then easily erase.  Make sure to prime, I learned this the hard way!!

IMG_3899

I know chalk boards may just be a trend, but I have loved them for years and imagine I will love them for years to come!