painted dresser || Chalk Paint® + MMS Milk Paint

About a month ago I picked up this cutie of a dresser at Habitat.  I thought it had darling lines and it was in good shape, it just needed some paint!

I kept the original brass hardware and I painted this dresser with 3 coats of Miss Mustard Seed Milk Paint, MARZIPAN.  I painted the sweet trim pieces with Annie Sloan Chalk Paint®, OLD WHITE.  I lighting sanded, just to distress the edges.  I sealed the entire piece with two light coats of Annie Sloan Clear Wax.

This cutie is for sale at the shop for $285.

a little fall decorating || at the cottage

I haven't been in the mood yet for Fall decorating. I think it hit me as September approached, that my baby was going to be in school all.day.long.  Of course I have my moments of frustration and exhaustion, but I really enjoy spending time with my girls.  I just wasn't ready for school to start, and in my book that meant not being ready for Fall decorating!  Now we are in the swing of our school schedule and my kindergartener loves school!  Savanna and I are having so much fun, just the two of us!  The weather is starting to change, as are the leaves, and I am finally feeling ready to add a few Fall touches.

img_6755

img_6757

After dropping Addilyn off at school, Savanna and I headed to the cottage to do a little Fall decorating.  We just added things that we took from the shop....pillows, faux pumpkins and mums.

img_6758

img_6760

img_6763

img_6766

img_6765

This was happening the entire time I was taking pictures.  This child is so full of life, energy and just pure crazy!  She was fluffing pillows, re-arranging pumpkins, moving flowers like she was the boss.

img_6780

img_6778

We took a few pictures inside too, I will post those soon.  In the mean time, here are a few details......

-Twig Wreath  | available at the shop, $75

-Faux Pumpkins, various sizes | available at the shop, ranging from $16-$30

-Les Indiennes Pillows | available at the shop

-The wood porch was painted 4 years ago with Chalk Paint®.  It has weathered and aged just perfectly!  We used the color GRAPHITE and COUNTRY GREY.

The andiron deck chairs were purchased 'raw' and we used Miss Mustard Seed Milk Paint (color TROPHY) to make a wash.  They look naturally grayed out and have held up perfectly!

Valentine's Day and a BEFORE video

Hello and Happy New Year!!  I hope you enjoyed your holiday season.  Ours was filled with family, friends, fun and some good doses of rest too! Last week, we closed escrow on a commercial building in downtown McMinnville.  We are super excited to move the studio downtown and expand the retail side of the business!!  I will share more as the shop space progresses, but I shot this little video right after we picked up the keys.  As you can see, the building needs a little help, but we love a good Fixer Upper!

[embed]https://www.youtube.com/watch?v=bcgjxYT2c_Q&feature=share[/embed]

The girls are at such a fun age.  I have enjoyed every season, but I am really enjoying all of the activities that we can do together!!  Yesterday we baked some brownies and decided to cut them into heart shapes and decorate them for Valentine's Day.  Such a simple activity but we had so much fun....then of course we had a little 'milk and brownie' movie night and enjoyed our sweets.

IMG_6583

IMG_6586

IMG_6587

IMG_6590

The brownies were a box mix, my favorite!  So easy, and so good!  Once the brownies cooled, we just used a heart shaped cookie cutter, sprayed it with oil and cute our hearts.  We sprinkled on a little powdered sugar and the girl decorated their hearts with these sweet little heart shaped candies.  Cold milk with cute straws and we were ready to cozy in and watch a few episodes of Madeline ;-)

And that cute tea towel in photo, that's one of the many cute tea towels I will have for sale at the new shop.  I just received my shipment and they are all DARLING.   I now have one of each color in my kitchen ;-)

Have a lovely weekend, and go bake some brownies!!!  Your family will love you (even more) for it!!!

PAINTED HUTCH || painted with Chalk Paint®

I often forget to take pictures of different pieces I am working on.  I guess I just get side tracked, or I am just ready to move onto the next project ;-)  However, I did remember so here are a few pictures on a small hutch I finished last week….

IMG_5769

The top is has three different colors/layers (all Chalk Paint®)…..French Linen, Old White, and the top layer is Pure White.  The bottom is painted with Paris Gray.  I lightly distressed the entire piece and then sealed it with Annie Sloan's soft wax.  After applying two coats of soft wax, I applied Miss Mustard Seed's white wax in areas and allowed it to build up, giving the piece a bit of a bleached look.

IMG_5774

IMG_5775

IMG_5778

I added new knobs, painted the interior and called it 'good'.  It's a darling little hutch and it will soon be on it's way to La Bella Casa!

IMG_5784

Enjoy your week and happy painting!!!

hand made growth charts

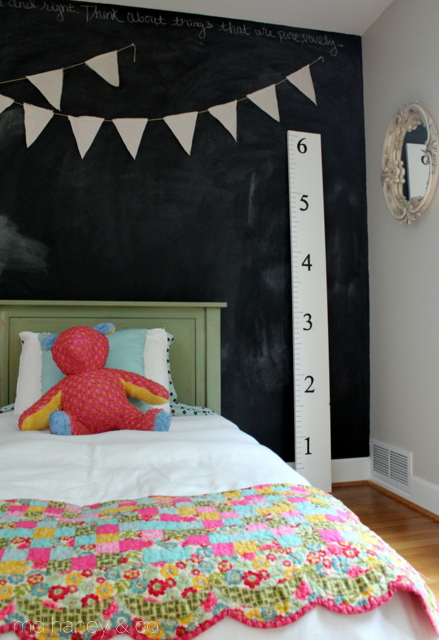
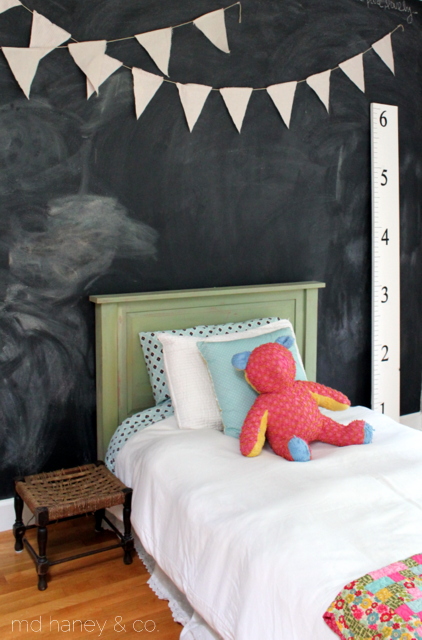
It must be the time of year, a few weeks ago I received requests for 4 custom growth charts, all within a two days.  The last time I made a growth chart was at least 4 months ago, it's so funny how things ebb and flow!

I know that there are a gazillion growth chart tutorials online, but I thought I would share the way that I make them, and hopefully inspire someone to make their own growth chart!  They take a few hours to complete, but I break mine up into stages and the results are so worth it!!

IMG_5629

IMG_5634

IMG_5636

IMG_5638

IMG_5640

IMG_5645

Supplies Needed:

~ 6' pine board, (the width can be whatever size you prefer)

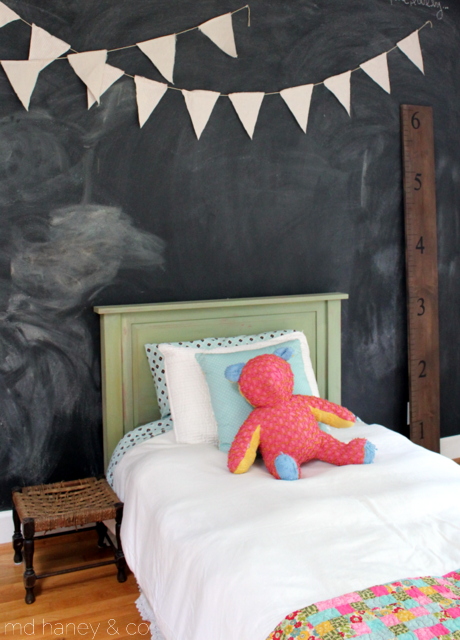
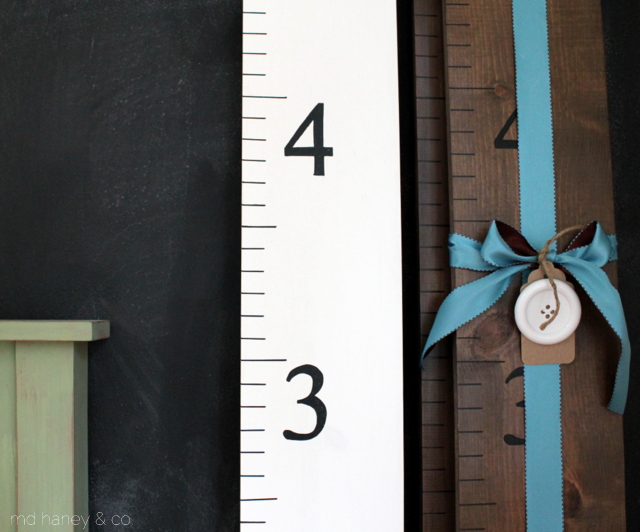
~ paint and wax (I used Annie Sloan Chalk Paint® for the white growth charts (Pure White) and Miss Mustard Seed Milk Paint for the dark growth charts (Curio).  I used Annie Sloan clear wax for both growth charts.

~ black paint pen

~ ruler 

~ saw tooth hooks

1. Paint the board, both sides.  Wax with clear wax.  

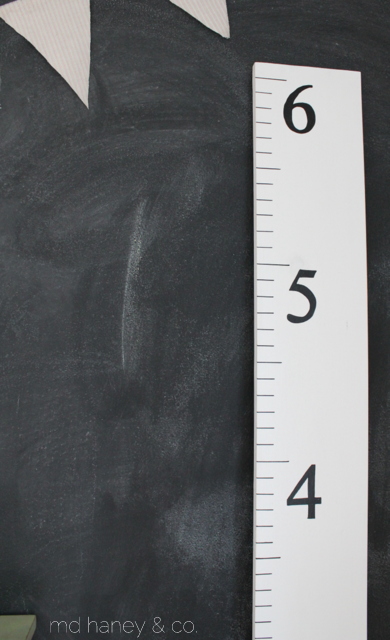
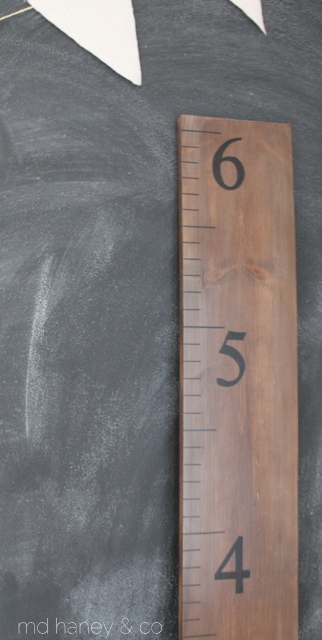
2. Using a sharp pencil and a ruler, mark the side of the board every inch.  The pine is soft enough that you can press the pencil into the wood and it will mark.  (I lay my board on the work table/counter, it's best to do this with the board horizontal.)   Once the inches are marked, go back with your straight edge and make a line at every inch.  I use the marks on my ruler as a guide.

3. Use a paint pen and a straight edge to go back over the pencil marks.  The paint pen gives crisp, bold marks.

4. Print off numbers 1-6 in your preferred font, I use TIMES NEW ROMAN.  Trace the numbers with a pencil.  Again, the pine is so soft that you will easily see your tracing line.

5. Color in the numbers with the paint pen.

6. Attach the saw tooth hook to the back and your growth chart is finished!

This would make a fun baby shower gift, new mama gift or just a gift to yourself ;-)  One of these days I am going to make some in fun colors!  What color would you choose?

GALVANIZED CLOCK || adding a touch of industrial

So, the Fall Vintage Sale was awesome!  A huge success and so much fun!!!  I was tired for days afterwards, and of course hardly snapped ANY photos!  I can't believe it….I only snapped a couple with my phone, right before we went to open the gate and let the flood of shoppers rush in!  Thanks so much to all of you lovelies who came, and to new peeps, it was fun to meet new faces and hug on the old ones!

sale2

sale1

On a different note, I have slowly starting gathering and ordering items for when we have a downtown space.  One of my favorite things so far has been this galvanized clock!

IMG_4731

IMG_4734

IMG_4730

Anything galvanized has become so popular over the last few years.  I love that it can really go with anything and yet totally changes the look of a space!  I bought two of these clocks….one to keep and one to sell.

DETAILS::  33.5" W x 33.25"L.  $128

If you are interested in purchasing it, just let me know!